Homemade airplanes. What is needed to successfully build a light aircraft. Aircraft model making
If for some reason you were not destined to become a pilot or pilot, and your financial capabilities do not allow you to purchase an aircraft, in this case, you can make it yourself. How to build an airplane, what is needed for this, what characteristics should it have? Let's go in order.
First of all, it should be remembered that the aerobatic properties of a homemade aircraft should be accessible to both ordinary amateurs who are behind the wheel for the first time, and professionals. It must be easy not only to operate, but also to take off and land. It should make it easy to perform simple aerobatics. In no case should the piloting scheme of your aircraft contradict generally accepted piloting standards, and non-standard control systems are strictly prohibited!
Speed limits
In the case when you and your family or friends decide: we’ll build the plane ourselves, we don’t need anyone, be sure to take into account the following requirements and speed limits:
- the aircraft's lift-off speed during takeoff must be at least 1.2 stall speeds;
- the approach speed must be at least 1.3 stall speed;
- landing speed is not less than 0.95 stall speed;
- cruising speed of the aircraft is not less than 1.3 stall speed;
- The stall speed itself should be no more than 90 km/h.
Stall speed is the minimum acceptable speed for any aircraft. The stall itself is accompanied by a lowering of the nose of the aircraft without a roll, and subsequently, the speed should increase. If this does not happen, then the pilot should pay attention to signs (shaking of the control stick or the structure itself) that indicate that the aircraft is approaching a stall.
In the event of engine malfunction, it is necessary to ensure that your aircraft is balanced in the prescribed straight flight. In this situation, you should stop the flight and land. It should be noted that the landing itself should also be extremely simple, focusing solely on favorable conditions and increased attention of the pilot. During the takeoff and run, the aircraft must adhere to the given direction as stably as possible.
The rate of climb after take-off must be at least 1.5 m/s, and the run and take-off run must not exceed 250 meters. 10 meters is the generally established height of flight over any obstacle bordering the runway. The soil strength of asphalt, dirt and concrete platforms from which the aircraft is operated should not exceed 5 kg/cm2.
Aircraft construction diagram
Before you build an airplane with your own hands, you need to decide on the model of the desired aircraft. If you want to construct an aircraft in a short period of time and with the lowest financial costs, in this case, the ideal option would be to build an ultra-light aircraft (ULA). Often, ULA has an upper wing arrangement. The distinctive features of this device are its simple design and low weight.
Experts recommend building ULA according to ready-made, custom-made drawings. After all, without experience in designing such devices, you can make a lot of serious mistakes, for which you will have to pay seriously. When designing an aircraft, it is necessary to take as a basis high quality work that will have a positive impact on your entire aircraft. If deadlines are tight, then for maximum productivity in building an aircraft, you need a good workshop and high-quality tools. The absence of these things will have a detrimental effect on the quality and speed of your work. Knowing theoretically how to build an airplane with your own hands and having prepared everything you might need, you can move on to practice.
Practical part
All work begins with the machining of aluminum blanks, from which parts of the future aircraft are created. You can either purchase such blanks or order the already required parts: fuselage, wings, etc. If your workshop is equipped with a special milling machine, in this case, you can obtain elements of the desired size and shape from metal blanks. Installation of rivets in the panels of each wing and fuselage of the aircraft, as well as drilling holes, is best done with a laser on a riveting machine. It can also be used to cut other small parts for aircraft. There are almost no straight parts in any aircraft, and in order to give the necessary curvature, you need to use a set of forms for covering on a press specially designed for this: you should install the element in the press, press it with belts and apply the necessary amount of force to achieve the desired shape. After this, you need to cover all parts with primer to avoid corrosion. Marking the installation of technological fasteners must be done manually. To avoid backlash, the holes of bolted connections must be processed in such a way that the joint is as tight as possible, because this increases the service life of the part itself. Don't forget to use headphones when building your aircraft, and even more so when hand riveting!
Power point- the heart of the aircraft, so if the engine of your aircraft is homemade and not purchased, it is necessary to provide for duplication of all important systems, as well as the possibility of starting the engine during flight. Each element of the aircraft control system must be highly reliable. It is necessary to consider the possibility of duplicating the most critical components of the aircraft. Take, for example, steering rods; if cables were used as cables, make sure that they cannot become pinched. It is necessary to secure the guide rollers well in the wiring of these cables. They must be able to withstand loads that can be several times higher than designed. Remember, your life during the flight depends on the reliability of these things. Do not forget to take sales receipts when purchasing the necessary materials; it is possible that they will be needed during the process of registering your aircraft.
Many of us often wonder: who built the first airplane? Who, one way or another, when creating our own, do we want to emulate at least a little? And the world's first aircraft, with a weight heavier than our air, was built by American inventors Orville and Wilbur. Their Wright airplane was equipped with an internal combustion engine. And on December 17, 1903, the first flight was made.
Since childhood, many boys have been fascinated by technology, various cars, trains, and airplanes. They are of great interest in all elements that are directly related to these subjects. To get your child interested in creativity, invite him to make toys together that look like an airplane.
Children's crafts in the shape of an airplane will be a great way to spend time together with your child. You can have fun free time. In addition, such crafts can be done together with the children at children's parties.

The photo of airplane-themed crafts demonstrates the variety of models that you can make with your own hands.

Airplane made of wood
When creating an airplane from wood, the question arises, what can you make an airplane out of? To create an airplane craft, you need to have a clothespin, wooden sticks, acrylic paints, brushes, Moment glue, scissors and sandpaper.


Algorithm for creating a toy airplane
Let's consider step by step instructions how to make an airplane. This will allow you to create a craft without any problems if you strictly follow the instructions for creating a toy airplane.
We take blue paint and paint the wings of the future airplane. Then we take red paint and paint the clothespins, which will later become the basis of the airplane. To create the hind wings, you need to cut the stick into two parts. Scissors must be used to round the cut edge.

The tail of the plane consists of a piece of stick. Cut a piece of 10 millimeters from the stick. To do this we use a stationery knife. The edge should not be smooth.

Using sandpaper, sand the surface of the wooden sticks. We paint the resulting parts and glue them together.


Cardboard airplane
To create this version of the airplane you will need blue cardboard, matchboxes, scissors, Moment glue, and cork.

We take a stencil and cut out all the parts of the aircraft, from which we will then create it.

We take a matchbox and glue it to the base of the plane. You need to cut out one small strip from cardboard, which you then glue to the base of the plane. Blanks of the same size are then glued on top of the matchbox on the other side.

To create a tail, you need to cut a strip measuring 50 millimeters by 10 millimeters. The edges are rounded on both sides. The resulting strip must be divided into three equal parts. Each strip should be 15 millimeters. To do this, you need to use a utility knife.

You need to glue stars to the airplane. They will become a real decoration of the model.

We take a wine cork. Using a utility knife, cut off a small circle. Next, apply a little glue to the surface of the cut piece of cork and glue it to the plane. Then you need to create a propeller. Its creation is described as a wooden airplane.

We take a needle that needs to be used to pierce the cork. Then we attach all the parts to the base of the plane. We create small flowers from several sheets of colored paper. To do this, you need to take a decorative hole punch. These leaves must be glued to the entire surface of the airplane.
Note! 


Airplane from a bottle
To create an airplane from a bottle, you need to take the bottle itself. Using a knife, you need to make several slits into which you will later need to insert cardboard. This cardboard should look like the wings and tail of an airplane.

From thick cardboard we cut out a part that looks like a propeller. In the center of this figure you need to cut out a place for a plastic plug. It is necessary to install a propeller over the neck of a plastic bottle, and then screw on the plastic cap. This will allow you to secure the propeller to the plastic bottle.

After this, you can invite the child to paint the plastic bottle in the color he wants. The child will be happy to color the base of the plane and its wings.

Thus, crafts from airplanes will be ready. The presented options for creating children's airplanes allow you to quickly make a craft.

You can conduct a master class on airplane-themed crafts. This will make the children's party more interesting and at the same time useful.

Note! 
You can make your own choice of materials for crafts with your own hands. If your child is interested in wooden crafts, then it is best to make an airplane out of wood, but if your child is interested in crafts from cardboard, then it is recommended to create a flower airplane.

Photo crafts airplane


Note! 


 Is it possible to build an airplane on your own these days? Tver amateur aviators Evgeny Ignatiev, Yuri Gulakov and Alexander Abramov answered this question in the affirmative, creating a winged single-seat aircraft, later called Argo-02. The plane turned out to be successful: it successfully flew at all-Union competitions, and was the first prize-winner of the regional review-competition of amateur aircraft in Yaroslavl. The secret of the increased popularity of the Argo among amateur aviators is not in the design or technological delights of the designers, but rather in their traditional nature. The designers managed to achieve a successful combination of design methods for wooden machines of the 1920s and 1930s, which had been developed over many decades, and modern aerodynamic calculations for aircraft of this class. This is, perhaps, one of the main advantages of the aircraft: its production does not require modern plastics and composites, rolled high-strength metals and synthetic fabrics - all you need is pine timber, a little plywood, canvas and enamel.
However, the simplest design made from common materials is just one of the components of the machine’s success. In order for all these pine slats and pieces of plywood to “fly”, they must be “fitted” into certain aerodynamic shapes. In this case, the authors of "Argo" - we must give them their due - showed an enviable design flair. For their plane they chose aerodynamic design classic cantilever low-wing aircraft with a pulling propeller.
Nowadays, against the backdrop of a wide variety of canards, tandems and other wonders of modern aerodynamics, an Argo-type aircraft even looks conservative. But this is the wisdom of an aircraft designer: if you want to build a successfully flying aircraft, choose the classic design - it will never let you down.
However, that's not all. In order for an airplane to fly well, it is necessary to correctly determine the ratio of its mass, engine power and wing area. And here the Argo parameters can be considered optimal for a device with a motor with a power of only 28 hp.
If someone wants to build a similar aircraft, the parameters of the Argo can be taken as a model: it is this ratio that ensures the best flight performance characteristics: speed, rate of climb, takeoff, mileage, etc.
At the same time, the stability and controllability of the aircraft are determined by the ratio of the area of the wing, tail and rudders, as well as their relative position. And in this area, as it turned out (as the Argo designers understood very well!), no one has yet invented anything better than the standard classical scheme. Moreover, for the Argo the parameters were taken straight from the textbook: the area of the horizontal tail is 20% of the wing area, and the vertical tail is 10%; the tail arm is equal to 2.5 times the aerodynamic chord of the wing, and so on, without any deviations from the classical design rules, from which there is obviously no point in departing.


1 – propeller spinner (fiberglass adhesive); 2 – propeller (plywood made of pine); 3 – V-belt reducer; 4 – engine type RMZ-640; 5 – sub-engine frame (pipes made of steel 30KhGSA); 6 – tachometer sensor; 7 – check valve; 8 – fire partition; 9 – gas tank filler flap; 10 – compensator; 11 – fuel tank (sheet aluminum); 12 – instruments (navigation and flight control and engine control); 13 – visor (plexiglass); 14-engine carburetor throttle control handle (EC); 15 – roll and pitch control stick; 16 – pilot’s seat (glued from fiberglass with epoxy binder); 17 – back of the chair; 18 – block of control cable wiring rollers; 19 – intermediate rocker of the elevator; 20 – elevator rod; 21 – engine hood (glued from fiberglass with epoxy binder); 22 – fuel filter; 23 – motor mount mounting unit; 24 – outboard heading control pedals; 25 – attachment point for the spring chassis; 26 – chassis wheel 300×125 mm; 27 – chassis spring (steel 65G); 28 – filling syringe; 29 – elevator control rod; 30 – fairing (glued from fiberglass with epoxy binder); 31 – intermediate elevator control rocker; 32 – block of rollers for rudder control cables; 33 – rudder control cable; 34 – elevator control rod; 35 – block of rollers for rudder control cables; 36 – rudder drive lever; 37 – tail support (crutch)

1– control knob; 2– engine carburetor throttle control handle (EC); 3 – THC; 4 – VR-10; 5 – EUP; 6 – US-250; 7 – VD-10; 8 – TE-45; 9 – shock absorber; 10-fuel tank; 11– fire hydrant; 12– heading control pedals

1 – aircraft roll and pitch control stick; 2 – engine carburetor throttle control handle (EC); 3– rudder; 4– elevator; 5 – aileron; 6 – heading control pedals
Although the aerodynamic data allows the aircraft to perform aerobatic maneuvers, aerial acrobatics means not only successful aerodynamics, but also high structural strength. According to the calculations of the authors and the technical commission, the operational load factor of the Argo was equal to 3, which is quite sufficient for circling flights and short routes. Aerobatics is strictly contraindicated for this device.
Amateur aircraft designers should not forget about this... On August 18, 1990, while performing a demonstration flight at a holiday dedicated to the Day Air Fleet, Yuri Gulakov introduced “Argo” into another coup. This time, the speed turned out to be slightly higher than usual, and the maximum operational overload, obviously, far exceeded the calculated “three”. As a result, the Argo's wing disintegrated in the air, and the pilot died in front of the assembled spectators.
As a rule, such tragic cases, even with all the obviousness of the reasons causing them, force us to look for errors in the design of the aircraft and in the calculations. As for Argo-02, the car withstood exactly as much as it was designed for. That is why the technical and flight methodological commissions for aircraft amateur built Ministry aviation industry at one time they recommended “Argo-02” as a prototype for independent construction.
"Argo-02" - ultra-light training cantilever low-plan of a classic wooden structure with a cantilever empennage. The aircraft has a spring-type landing gear with a tail support.
The power plant is a two-stroke 2-cylinder air-cooled engine RMZ-640, which drives a two-blade wooden monoblock propeller through a V-belt gearbox. The aircraft control system is of a normal type. The cockpit is equipped with flight team instruments and engine control instruments.
The fuselage is wooden, of a braced truss design, with spars made of wooden slats with a cross-section of 18x18 mm. Behind the cockpit, on top of the fuselage, there is a light garrot, the basis of which is foam diaphragms and stringers. There is also a garrot in the front part of the fuselage; in front of the cabin it is made of wooden diaphragms and casing made of sheet duralumin 0.5 mm thick. Cockpit and tail section The fuselage in the area where the stabilizer is attached is covered with plywood 2.5 mm thick. All other surfaces of the fuselage are lined.
The center section spars pass through the cockpit, to which the pilot's seat molded from fiberglass and covered with artificial leather and the manual control station of the aircraft are attached.
The inside of the cabin is covered with foam plastic, and on top of it with artificial leather. On the left side there is an throttle control lever - the throttle control handle for the engine carburetor.
The instrument panel is knocked out of sheet duralumin and covered with hammer enamel. In the cabin it is attached to frame No. 3 on shock absorbers. The following devices are mounted on the board itself: TGC, US-250, VR-10, VD-10, EUP, TE and ignition switch, under the board there is a fuel tap, and on the front spar there is a filler syringe. In the front part of the fuselage, under the garrot, there is a fuel tank with a capacity of 15 liters.
The landing gear attachment points are installed in the lower part of the fuselage in front of the front spar. On the front frame, which is also a fire partition, a link-type pedal mounting unit and a roller and foot control fixing unit are mounted. On the other side of the firewall there is a check valve, a fuel filter and a drain valve.
The motor mount attachment points are installed at the junction of the side members with the front frame. The motor mount itself is welded from chromansil (steel 30GSA) pipes with a diameter of 22×1 mm. The engine is attached to the motor mount via rubber shock absorbers. The power plant is covered with upper and lower fiberglass hoods. The propeller blank is glued together from five pine plates with epoxy resin and, after final processing, covered with fiberglass using an epoxy binder.


The basis of each half-wing is a longitudinal and transverse set. The first consists of two spars - the main and auxiliary (wall), a frontal stringer and a flow fin. The main spar is double-flange, the upper and lower shelves are made of pine slats of variable cross-section. So, the cross-section of the upper flange: at the root of the wing - 30x40 mm, and at the end - 10x40 mm; bottom – 20×40 mm and 10×40 mm, respectively. Diaphragms are installed between the flanges in the area of the ribs. The spar is covered on both sides with plywood 1 mm thick; in the root part - plywood 3 mm thick. Wooden bosses are fixed in the root part of the wing and the area where the aileron rocker is attached.
The joints between the wing consoles and the center section are mounted in the root part of the wing on the front (main) spar. They are made of steel grade 30KhGSA. At the end of the spar there is a mooring unit.
The front stringer of the wing frame is made of a wooden lath with a cross-section of 10×16 mm, the tail stringer is made of a lath with a cross-section of 10×30 mm.
From the toe to the front spar, the wing is covered with 1 mm thick plywood. A ladder is formed in the root part of plywood 4 mm thick.
The transverse set of the wing includes normal and reinforced ribs. The latter (ribs No. 1, No. 2 and No. 3) have a beam structure and consist of shelves with a section of 5 × 10 mm, racks and a plywood wall 1 mm thick with relief holes. Normal ribs have a truss structure. They are assembled from shelves and braces with a cross-section of 5×8 mm using scarves and booklets. The wingtips are foam. After processing, they are covered with fiberglass with an epoxy binder.
The aileron is a slotted type with a frame made of a spar with a cross-section of 10×80 mm, ribs made of plates 5 mm thick, attack ribs and flow ribs. The toe is sewn up with plywood 1 mm thick; Together with the spar, the lining forms a rigid closed profile, reminiscent of a semicircular pipe. The aileron linkage units are mounted on the spar, and the counter linkage brackets are mounted on the rear wing spar. All surfaces of the aileron and the wing itself are covered with fabric.
The horizontal tail of the Argo-02 aircraft consists of a stabilizer and elevators. The stabilizer is two-spar, with diagonally arranged ribs, which provides it with high torsional rigidity. The toe to the front spar is covered with 1 mm thick plywood. The stabilizer can be used in both cantilever and strutted versions. The second option involves installing strut attachment points on the rear spar. The attachment points for the stabilizer to the fuselage are mounted on the front and rear spars. The elevator linkage units are located on the rear stabilizer spar; their design is similar to the design of the components of the A-1 airframe. The ends of the stabilizer are foam plastic, covered with fiberglass, the central part is covered with plywood.
The elevator is made of two parts, which to some extent duplicate each other. Each part consists of a spar, diagonally placed ribs with toes and flow ribs. Bow The steering wheel is covered with plywood 1 mm thick. The elevator control horn is fixed in the root part.
The vertical tail of an aircraft is the fin and rudder. The keel is structurally integral with the fuselage according to a two-spar design. Its frontal part (up to the front spar) is covered with plywood. The rear spar is a development of the rear fuselage frame.
The rudder is similar in design to the elevator or aileron. It also consists of a spar, straight and braced ribs and a fin. The front part of the steering wheel up to the spar is covered with plywood. The attachment points are fork bolts. The control lever is fixed in the lower part of the spar. The strut fastening unit is also mounted there. The entire plumage is covered with canvas.
The main landing gear of the aircraft is two-wheeled, spring type. The spring is curved from steel 65G; Wheels measuring 300×125 mm are attached to its ends. The spring is attached to the fuselage by a steel plate and a pair of bolts on each side, with the help of which the spring is clamped and thereby fixed relative to the fuselage.
The tail support is a strip of 65G steel attached to the fuselage with two bolts, to which a support cup is screwed from below.

1 – carburetor; 2 – check valve; 3 – fuel filter; 4 – consumable container; 5 – tank plug with drainage; 6 – fuel tank; 7 – fire hydrant; 8 – power supply connection; 9 – drain fitting; 10 – drain valve; 11 – filler syringe

1 – static pressure distributor; 2– durite hose; 3 – aluminum pipeline; 4 – receiver air pressure(PVD)
The elevator control is rigid, using a handle (from a Yak-50 aircraft), duralumin rods and intermediate rockers. Aileron control is also tight. The steering wheel drive is cable driven, using suspended lever pedals, steel cables with a diameter of
3mm and textolite rollers with a diameter of 70 mm. To prevent foreign objects from getting into the control units, the floor and the route of rods and cables are covered with a decorative screen.
The power plant of the aircraft is based on an RMZ-640 type engine, mounted on an engine mount in an inverted position - with the cylinders down. On top of the engine is the upper pulley of the V-belt gearbox with a belt tensioning mechanism. The fiberglass hoods are secured with screws to self-locking anchor nuts on the fuselage and connecting ring.
The propeller is glued together with epoxy resin from pine plates, and then processed according to templates, covered with fiberglass and painted. The Argo 02 used several of these propellers with different diameters and pitches. One of the most acceptable in terms of its aerodynamic qualities has the following characteristics: diameter – 1450 mm, pitch – 850 mm, chord – 100 mm, static thrust – 85 kgf. The propeller spinner is glued out of fiberglass with an epoxy binder and mounted on a duralumin ring. Fastening the spinner to the propeller with screws.

IN fuel system The aircraft includes a fuel tank with a capacity of 14 liters, fuel pump, fuel filter, check valve, fire hydrant, drain cock, tee and piping system.
The fuel tank is welded from aluminum sheet 1.8 mm thick. In the lower part there is a supply container into which the supply and drain fittings are welded, in the upper part there is a filler neck with drainage, inside there are communicating partitions to prevent fuel foaming. The tank is secured to two beams using tie straps with felt pads.
The air pressure receiver system (APR) consists of an APR tube (from the Yak-18 aircraft) installed on the left plane of the wing, dynamic and static pressure tubes, connecting rubber hoses, a distributor and instruments.
Flight technical data of the aircraft
Length, m………………………………………………………4.55
Height, m……………………………………1.8
Wingspan, m…………………………………..6.3
Wing area, m2……………………………6.3
Wing narrowing……………………………………0
Wing end chord, m……………………..1.0
MAR, m…………………………………………………..1.0
Wing installation angle, degrees…………………..4
Angle V, degrees…………………………………………..4
Sweep angle, degrees…………………….0
Wing profile……………………….R-W 15.5%
Aileron area, m2………………………..0.375
Aileron span, m……………………………..1.5
Aileron deflection angles, degrees:
up……………………………………………..25
down…………………………………………………….16
GO range, m……………………………………..1.86
Area of the urban area, m2…………………………………..1,2
GO installation angle, degrees………………………..0
RV area, m2…………………………….0.642
VO area, m2…………………………………0.66
VO height, m……………………………………1.0
Area PH, m2…………………………………0.38
Deviation angle PH, degrees…………………- 25
Deflection angle РВ, degrees………………….- 25
Fuselage width along the cabin, m…………0.55
Height of the fuselage over the cabin, m………….0.85
Chassis base, m……………………………………2.9
Chassis track, m……………………………………1.3
Engine:
type…………………………………………RMZ-640
power, hp…………………………………………..28
Max. rotation speed, rpm ………5500
Gearbox:
type………………………………..V-belt,
four-strand
gear ratio…………………………….0.5
belts, type……………………………………………………….A-710
Fuel……………………………..gasoline A-76
Oil……………………………………..MS-20
Screw diameter, m……………………………1.5
Propeller pitch, m…………………………………..0.95
Static thrust, kgf……………………………95
Weight of empty apparatus, kg…………………145
Maximum take-off weight, kg………7235
Fuel capacity, l…………………………………15
Range
flight balances, % MAR…………24. ..27
Stall speed, km/h……………………72
Max. speed
horizontal flight, km/h……………..160
Maximum
piloting speed, km/h…………….190
Cruising speed, km/h…………………120
Lift-off speed, km/h………………………….80
Landing speed, km/h……………………70
Rate of climb at the ground, m/s………………2
Takeoff run, m……………………………………………………….100
Mileage, m………………………………………………………..80
Range
operational overloads…….+3..- 1.5
A. ABRAMOV, Tver
Noticed a mistake? Select it and click Ctrl+Enter to let us know.
Cri-Cri is the creation of French engineer Michel Colomban.
This plane looks more like a large model than a real plane.
And yet, with a span of 4.9 m and a flight weight of 170 kg, this is a full-fledged two-motor aircraft!
“During the flight, I feel like I’m sitting in a lift-up seat, and although I’m 10 kg heavier than the rest of the plane, it’s extremely good for air travel, says plane tester Robert Buisson...”
Who today does not know, at least in the circles of light aviation enthusiasts, the name and vicissitudes of a small twin-engine aircraft called "Cri-Cri" - an aircraft that could be seen at many aviation festivals and which became the subject of numerous articles and press publications.. .
It all started in 1958, when the first mention of a small single-seat aircraft with two engines with a total power of 20 hp appeared. It's been years rapid development home aircraft construction. But circumstances did not allow the designer from Rueil-Malmaison to realize his dream. What, they “abandoned” “Kri-Kri”? Will he ever appear? How long will it remain on paper? These were the main questions asked by numerous amateur designers. Only in September 1970, 12 years later, the designer began work with the active help of his wife. There were many requirements for the prototype. It was assumed that this would be the smallest, fastest and most economical production aircraft that would meet the concept of “an aircraft for everyone.” Construction of the prototype began in 1972 in the designer's garage. After 1200 hours of work, the plane was ready.
So, his twin-engine “mini”, weighing 63 kg and resembling a large model rather than a manned aircraft, aroused the surprise and interest of many aviation enthusiasts. At first glance, he looked unusual. The simple angular shape of the fuselage, the unusually large “streamlined” cockpit canopy, as well as two engines mounted on pylons in the forward part of the fuselage - all this looked strange and tempting. First of all, this relates to the arrangement of the engines, which is unique (at that time) in world practice.
The first flight of the MK-10 Cree-Cree (F-WTXJ) prototype took place on July 19, 1973. In front of a small group of spectators, photographers and television cameramen, Robert Buisson, a 68-year-old pilot with more than 12,000 flight hours, took off from earth an unusual plane. In flight, "Kri-Kri" resembled a small fighter...
In Germany, at an aircraft model competition, a funny incident happened with this plane.
Naturally, everything that happened was planned in advance.
Since the plane looks more like an aircraft model, one of the “spectators” was offered a ride on the “model”, he agreed)))
The man was seated in the cockpit in front of everyone, the pilot on the ground took the remote control and began to “take the model” to the start. I took off safely, made a couple of circles over the airfield and then panic began, the “pilot” announced that he had lost control of the model and there was a man there!
While he was trying to “restore communication,” the plane disappeared from view. Imagine the state of the public before whose eyes the “tragedy” played out!
But as you may have guessed, everything ended well)))
Flight performance"Cri-Cri":
- total wingspan, m 4.9
- wing chord (without flaps), m 0.48
- wing chord (with flaps), m 0.63
- total wing area, sq.m 3.1
- V wing (from the root), deg 4
- total length of the aircraft, m 3.91
- total height of the aircraft, m 1.2
- range G.O, m 1.55
- chord G.O, m 0.395
- chassis track, m 1.1
- chassis base, m 1.15
- diameter x pitch of propellers, m 0.695 x 0.95
- engine, 2 pcs. JPX PUL-212 15 HP
- fuel tank capacity, l 23
- maximum empty weight, kg 75
- maximum take-off weight, kg 170
- Max. dive speed, km/h 280
- Max. cruising speed, km/h 200
- Max. rate of climb, m/s 6.5
- ceiling, m 5000
- run, m 100
- mileage, m 150
- fuel consumption, l/100 km 5
- Max. overload, g +10/-5
- Max. aerodynamic quality 11
- The plane can continue to take off with one engine running.
- The rate of climb is 1.5 m/s.
- All metal construction!
Of course you can buy a ready-made model.
But due to the simplicity of the design of the model’s contours, it is not difficult to build it yourself using foam technology, cutting out parts with a heated string or using “ceiling” technology.
Fortunately, there are drawings.
Working drawings of this miracle:
Video:
There is also an electric version.
And even reactive.
As you can see, the plane is equipped with “model” engines.
Both internal combustion engines, electric and jet engines!
A model of this wonderful airplane is also sold here.
Balsa model copy of CRI-CRI MC-15, 1778 mm - http://www.parkflyer.ru/36402/product/544404
Airplane made of EPO Cri-Cri with a span of 1050 mm - http://www.parkflyer.ru/36402/product/1457910
So, how can you get your hands on a Cri-Cri plane? Actually, there are only three ways:
1. The easiest way, which is also the riskiest, is to buy a used plane.
In Russia, it is almost impossible to find such an offer for sale, so the path is to English-language sites. At the time of writing, the cost of a foreign “Cricket” ranged from 7 to 10 thousand euros. The dangers are still the same - engines. More than half of all Kri-Kri accidents occur due to engine failure, so special attention is paid to their selection and maintenance. The most preferable purchase options here may be “Cricket” - this is the name of the models produced by Zenair.
2. The second way is to purchase a new aircraft from one of the assemblers.
We were unable to find at least one official assembler of Kolomban aircraft in Russia. However, there are several companies that produce “analogues” - that is, aircraft that are similar in appearance to the Kri-Kri, but differ in production technology. The most popular deviation from the canon is fuselage materials. In the original version, the plane is almost entirely metal, while “optimizers” prefer to use wood or composite materials. The cost of such models usually does not exceed 10 thousand euros, excluding the price of engines.
3. Finally, the most reliable and official way is to contact Michel Colomban, buy the plans and assemble the plane yourself.
The cost of a set of drawings varies from 500 to 700 euros and depends only on the mood of the designer himself. The drawings are very detailed, most of them are made on a 1:1 scale. The drawings are accompanied by instructions, which, according to Colomban, can be understood by anyone who has ever opened the hood of a car. However, in addition to the papers, the buyer will receive an invaluable opportunity to communicate with the concept artist himself, ask him questions and receive recommendations on the use, for example, of the same engines.
For those who decide to assemble the plane themselves, you should write a letter or send a fax to Michel Colomban:
Michel Colomban
37 Bis Rue La Kanol
92500 Rueil Malmaison, France
Fax: 0033 147 51 8876
Good luck in your endeavors!
Good day everyone! How are you feeling, girls and boys? In the last article we did it, and in this article we will make the plane of your dreams))). True, it will be made of paper, but it will be such that it will fly quickly and far and no one will be able to catch it.
And then you can organize a competition and let all the paper airplanes race, what do you think of this idea? Probably just great, because spring is coming soon, and then summer, when there will be much more fun and entertainment than now.
Everyone knows this toy, even kids, who also love it and willingly sit with great interest and fold A4 sheets to get a wonderful craft and at the same time a flying machine above the ground.
The simplest method is familiar to all of us from childhood; absolutely everyone, both mothers and fathers, remembers it. Take a look at this picture.

First of all, we’ll make an airplane that flies far, the main thing is that it flies straight and beautifully. Just what you need to make it fun and you can watch him))).
We will need:
- A4 sheet - 1 pc.
Stages of work:
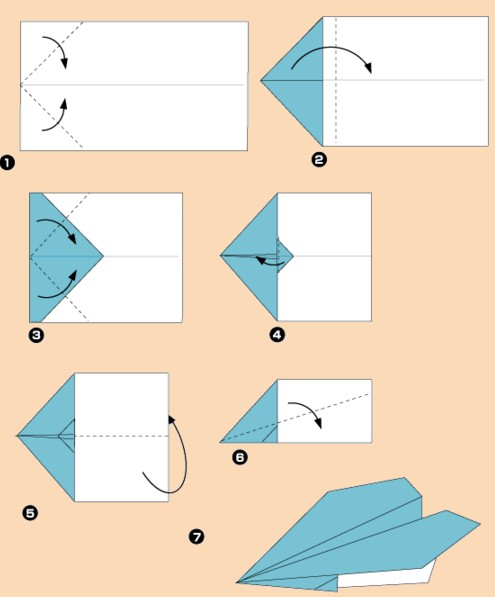
1. Take a sheet, our toy will be made from it. Decide on a color, you can take a traditional white sheet, or you can take, for example, green or blue.

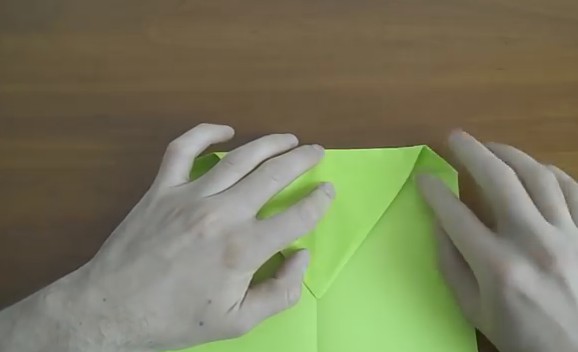
2. Place the paper horizontally in front of you and fold it in half. We will do it using the origami technique.

3. Then open and turn vertically. Start bending towards the straight line you've marked.

4. This way you get a triangle at the top.
5. Now fold the resulting line back to the outer one. Do this on both sides.

6. Repeat the steps again.

7. This is what should happen.

8. Then open all folded parts.

9. Fold the paper on both sides where you have two marked lines towards the center strip.

10. At the intersections, fold the sheet of paper forward.
11. Press the line with your fingers.
12. Open and return the sheet to its original position.
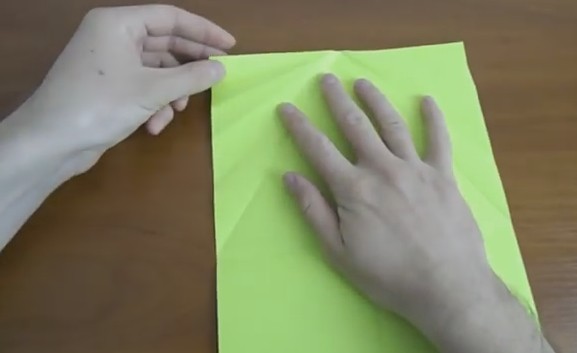
13. Then bend along the first top line.

14. Fold to the center horizontal line.

15. Place the resulting corner exactly on the line.
16. Then turn the sheet over reverse side and fold along a horizontal line.

17. Turn the sheet over again to the other side and make the triangle look up.

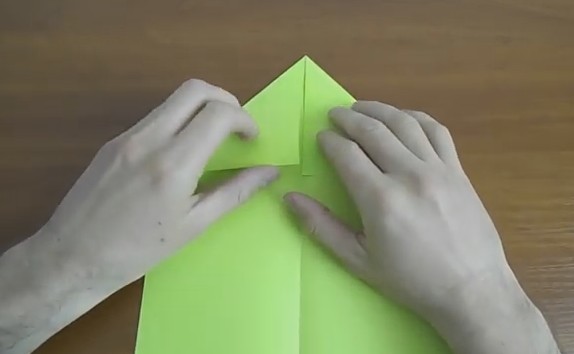
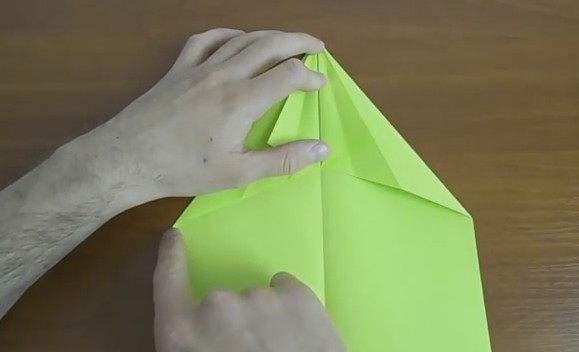
18. Fold the top parts of the center line, as you begin to do this, the product will begin to come together.
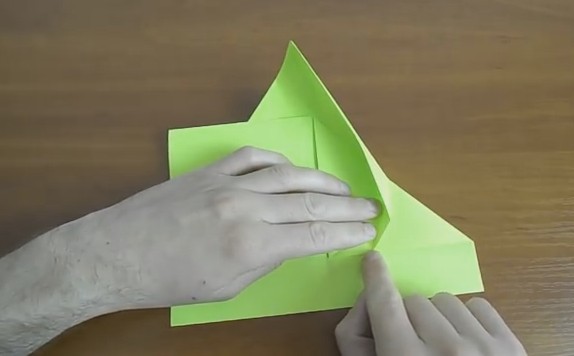
19. Therefore, you have to push the paper with your own hands very carefully.

20. These actions need to be done on both sides.


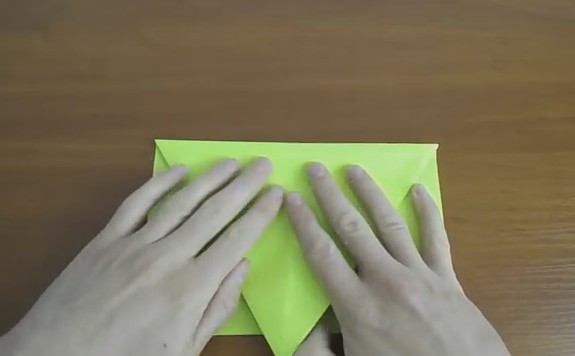
21. Fold it in half.

22. Fold the wings of the airplane.
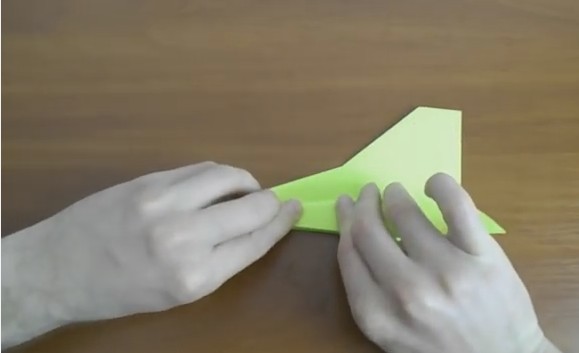
23. Afterwards, make bends of 1-1.5 cm on the wings themselves.
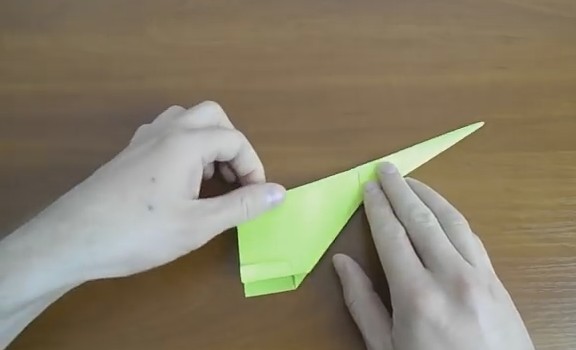
24. Open the airplane and straighten your wings. This is such a handsome guy, and he’s ready to fly. Look, just don't fly too far))).

Paper airplane using origami technique in 5 minutes
For the smallest fidgets, there are, of course, simpler instructions, such souvenirs turn out just as good and they fly very well too, depending on how you launch, you may not even be able to catch up; they will fly wow 100 meters, you’ll be exhausted looking for them later).
The most important thing is that you need to make the two sides the same in a mirror image so that they turn out even and then everything will definitely work out.
On one of the forums I spotted a craft called Piranha, and does it look like it’s true? The author also chose red as the color. See how cleverly you can roll up such a miracle. No special skills are required. The most primitive option with a simple model.

It turned out to be a cool thing, my boys really liked it).

By the way, you can get a little creative and give dad a little surprise.

In general, make a craft with your child so that there is something to do with your beloved family, because such work brings you very close together.

Step-by-step instructions for a flying toy for beginners
The interesting thing is that almost any plane can fly a sufficient number of meters above the ground, it can be 10,000 or even more than 1,000,000, the most important condition is, depending on what height it will be launched from and whether there will be wind outside and how it will pick it up.
If you want your airplane to never fall over, then use this scheme. This toy will show you a uniform and very fast flight. You yourself will be very amazed.

If you like this type of air transport with large wings, then fold this type of airplane.

You can build it with a blunt nose, there will be no collisions.

Well, if you don’t understand diagrams and instructions at all, then watch this step-by-step video from the YouTube channel:
How to make a paper airplane that will fly very far, up to 10,000 meters?
In fact, there are quite a large number of different paper models of this air transport. Leading on this moment became Hawk, Owl, Falcon and Albatross.
And that’s not all, I propose to build a powerful and beautiful airplane called Thunderstorm.
Stages of work:
1. Be sure to bend a sheet of paper symmetrically, straighten the resulting line very well with your hands, then turn it back.

2. Make a triangle at the top, as we did in the first example.

3. On both sides, bend the leaf again towards the center, you will get a sharp triangle.

4. Then bend the sheet where the bend point has formed.


6. Next, fold the triangle forward again.

7. Turn the resulting masterpiece over and bend it again.

8. Bend the plane in half. Bend the upper part of the wings slightly, as shown in the photo.

9. And then bend it so that you get real ones, like an airplane.

10. Voila, and this is what happened, it looks cool and cool, but it flies, well, it’s definitely fast and far).

DIY paper airplane model for children with folding patterns
Do you want to make a bunch of wonderful and beautiful airplanes with sharp or blunt noses together with your kids?
First of all, learn how to make these yourself, and then teach this easy task to your little helpers. Start with the simplest model.
If you don't understand this diagram, move on to the next one and choose.

Making a planner from A4 sheet is easy and simple
If you want another look that can be obtained in a matter of minutes, and you won’t need to fold and bend much, a completely different technique is used. It turns out cool and original. In general, a cool option for a child who will happily launch it in the air.
We will need:
- paper
Cooking method:
1. Fold the A4 sheet in half and draw a line with your hands. Take scissors or a utility knife and cut along it.

2. You will get two small leaves, fold one sheet in half again and draw a blank with a pencil, which you can request from me completely free of charge, and then print it on your printer.

3. Cut according to the template and don't forget to make gaps on the wings and tail as shown in the picture I sent you.


5. Take your time, iron the lines carefully and evenly.

6. There is no need to rush, otherwise it will turn out to be a blunder.

7. Place a piece of plasticine into the nose of the air transport and close it.

8. Where you made the cuts on the tail, bend and straighten the paper.

9. Do the same with the wings.

10. To give it the flying ability, you need to smooth out the wings using a pencil and curl them a little.

11. It should look something like this. To check the elevator, lower the plane vertically, it should take off like the wind, but do not overdo it.

If your airplane tilts to one side, then adjust it, because you can lower or raise the adjusters.
Volumetric cardboard craft
We will need:
- cardboard - 2 sheets
- PVA glue
- ruler
- pencil
- scissors
- Matchbox

Stages of work:
1. Mark two strips on the cardboard with a pencil; their width should be equal to a matchbox.

2. Then use scissors to cut them out. Use these strips to make airplane wings. On another sheet, mark two 1.5 cm wide strips and also cut them to the length of the cardboard.

Move one such thin strip, and cut the second into two parts of 8 cm, remove the rest, it will not be needed. Here's what happens:

3. Now start assembling. Take a matchbox, bend a long thin strip in half and attach it, glue it to the box.

4. Using two identical strips that are wide, like boxes, make wings.

The corners can be rounded; cut them with scissors.
5. Make a tail from one short narrow strip and also round it, glue it inside. And glue the second one on top, make a triangle out of it.

6. Then you can cut out the propeller and glue it.
7. The craft is ready, enjoy your work!

Video on how to roll a Fighter without glue

Of course, such a craft will be difficult to do if you are doing it for the first time, so I suggest starting by watching a video that will definitely teach you how to create such a beauty.
Well, how did it work out for you? Is it really easy and simple and without glue, and not as difficult as it seems at first glance?
And if you have problems with the Internet, then you can always use the scheme, especially if you suddenly forget something, this is also an option.


P.S. By the way, craftsmen even make such airplanes from one match, see for yourself:
Well, that's all for me. I wish you creative success and good luck! Create for your health, play and have fun! All the best and joyful. Bye everyone!
It might be useful to read:
- How to get on an excursion to Antarctica?;
- Czech Republic Troy Castle. Troja Castle in Prague. Ancient winery and museum;
- Böcklin and his “island of the dead” A cultural phenomenon of its time;
- Air tickets to Crimea Air tickets to Crimea will become cheaper;
- What you can and cannot take with you;
- Open left menu Heviz How to get from Budapest to Lake Heviz;
- Cable car in Nha Trang (Vinpearl) The longest cable car in the world Vietnam;
- Kamenets-Podolsk fortress - a historical monument of Ukraine Life outside the walls of the Kamenets-Podolsk fortress;