How to make a sundial with your own hands
Recently, owners of suburban areas are increasingly striving to decorate their backyard areas in some unusual and original way, using those structural elements that will make the area truly exquisite and unique. If we are talking about a European garden, then here it is a sundial that will fill the territory with a special philosophy. Today we will find out, but first we will deal with some important points.
Interesting fact! Did you know that you can make a garden labyrinth with your own hands? If you want to know more, read.
Brief historical excursion
Sundials gained particular popularity in the 17th-18th centuries and were used mainly in classical-style gardens - first in, and soon in. They first gained popularity as part of palace ensembles, but their widespread popularity is associated with the transformation of clocks into an independent element of decorative gardens, which, by the way, were made in a wide variety of styles.

It is often said that Europe is not a suitable place to create a sundial on a site, they say, this is just another attempt to stand out among other summer residents, and an unsuccessful one. And they say this because our climate is not suitable for this, since there are many cloudy days. You will be surprised, but all this is just another misconception! For example, in England, with its frequent fogs, rare classical gardens do without this decorative element.
Video - Making a sundial
On the role of the element in the landscape
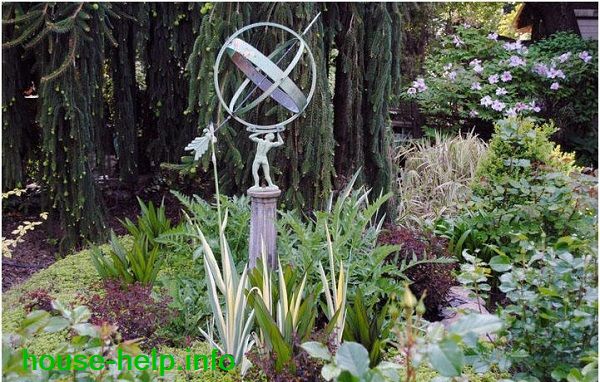
Usually the sundial is located in the center of the flower bed and is the dominant element, as it is located on a pedestal or other elevated surface. We also note that the pedestal is an important element of this composition, which is sometimes made in the form of a column.

Sundials are designed to attract attention, for this reason their size is directly related to the size of a particular area. If the area is small, then it is advisable to install the clock on a path, next to a lawn or a small but bright flower bed. But in a landscape or forest garden it is better to surround them with flowers so that they, invisible from afar, suddenly appear before your eyes when approaching. In addition, in small gardens, sundials are often installed in the form of decorative figurines.

Thanks to the huge variety of materials and shapes used to create a clock, you can get a design that takes into account the characteristics of the garden where it is created. So, if the garden is in an avant-garde style, but when creating a sundial, the most insignificant details should be taken into account. Here the clock can become part of a recreation area, a playground or even a gazebo. Moreover, they can effectively decorate a garden pond or fountain.

There is a concept of “live clock”. This is another option how to make a sundial with your own hands, but using flowering living plants, which will serve as material for the formation of the dial and hands.

Sundial design
Any sundial is based on two elements:
- frame is a flat surface on which the corresponding markings (dial) are applied;
- The gnomon is a rod that is attached to this surface.

Any material that is resistant to atmospheric factors can be used to make watches. It could be stone, cement, iron, wood, plastic or even gravel. It is advisable that the dial be light (it can be white marble, limestone, etc.): this way the shadow from the gnomon will be more noticeable. And the gnomon itself, by the way, can be made from long nails, plastic pins or knitting needles.
Note! The length of the pointer should slightly exceed the circumference of the dial.
Such watches can decorate and enliven any landscape. Especially if live plants not exceeding 50 centimeters in height were used for it. For example, calendula flowers bloom at about six o'clock in the morning and close at four in the evening (even if the day is cloudy).
Main types of watches
Historically, there are three types of sundials. Let's get acquainted with each of them.
- Vertical elements are installed mainly on the walls of buildings, pillars or fences. The frame in them “looks” exclusively to the south, at an acute angle (or at an angle of 90 degrees) relative to the noon line. It is also important that the gnomon is located slightly above the core of the dial - it should be deflected to the south, approximately 90 degrees from the vertical line (the geographic latitude of the region is subtracted).
- A distinctive feature of horizontal clocks is that they are able to show time all year round, although their indicators in winter and autumn are not entirely reliable. In such designs, the gnomon is located at an angle relative to the horizontal, equal to the geographic latitude of a particular region. A horizontal clock can be installed in the middle of a lawn, flower bed or garden pond. In addition, stones or stumps can be used for digital divisions.
- Equatorial clocks have one significant drawback: they accurately show time only during certain periods of the year. For example, for the northern regions the “exact” period is the period of time between March 22 and September 22. But if you consider that the summer season lasts from late spring to early autumn, this will be quite enough.

![]()
Now let's talk about the features of the installation process itself. In principle, it is already shown in the image below, but the dial in this case was actually made for solar time, that is, for those regions where noon occurs exactly at twelve o'clock, in fact, as it should be.

But, unfortunately, in different places noon occurs at different times - far from 12 o'clock. Therefore, if your plans include seeing local time on the dial, then it (the dial) will have to be slightly modernized. To do this, the numbers on it must be shifted around the axis so that the shortest shadow (namely, it will be observed at noon) moves exactly along the noon line (north/south).
But the procedure for finding the noon line is a separate story, but you need to know about it before how to make a sundial with your own hands. So, a compass is unlikely to help in this case, since the magnetic and geographic poles of the planet do not coincide: for St. Petersburg this is, for example, about 8 degrees - that is, the “gap” is on average 30 minutes, which is not so little . The most primitive method is the following: take a sheet of plywood, insert a screw or nail into it at an angle of 90 degrees, then place the plywood on a horizontal surface and note the movement of the shadow from the pin every fifteen minutes. After this, connecting all the points with a line in 3 hours, determine the smallest shadow - it will be that same noon line.
Note! Another practical tip that will help you when making according to the instructions presented below: before you start using stone or metal, it is advisable to practice with plywood. If you mess it up, nothing bad will happen, but you will gain practical experience.
And one last important point. If we are talking about a really good equatorial sundial with a flat frame, then it should have two dials at once - on the lower and on the upper planes. The first will work from autumn to spring, the second - from spring to autumn. Although, as noted above, this does not play a special role for a summer cottage, since people live there mainly in the summer, therefore, one dial will be enough.
![]()
Before starting work, you should decide on the location. It is advisable to install them on a flower bed or lawn, where sunlight will be available throughout the day. What is typical is that the clock can be placed on both a flat and an inclined surface (although in the second option it should be remembered that in order to obtain a shadow of the same length throughout the day, the required angle of inclination must be correctly determined). To calculate it, a special formula is used: 90 degrees are taken and the latitude of the region where your summer cottage is located is subtracted from it. But in the case of a flat surface, the length of the shadow falling from the gnomon will change throughout the day.

Of course, a shadow of constant length will look more impressive, although this is not important for the simple reason that the length of the shadow from the gnomon can be increased mentally.
Video - Sundial in the landscape
Once you've chosen your location, you can start creating your watch face. Its shape, let’s say right away, can be different, but in most cases preference is given to the good old classics - a circle or a square - since these are the easiest shapes to recreate. And if you don't know how to make a sundial with your own hands and from what, we answer: a variety of materials can be used for this. Among them we highlight:
- stone;
- driftwood of unusual shapes;
- coniferous perennial plants;
- bright flowering plants, etc.
All this can be used to form hour divisions on the frame. But how to divide the area into these divisions? Take a watch (electronic or mechanical - it doesn’t matter) and, based on its readings, every hour mark the position of the shadow cast by the gnomon during the day.
![]()
It is advisable to do this on the day that is characterized by the longest duration. Mark each number with a peg - this way you will get different angular readings between the marks.
Note! If we talk about the gnomon itself, then it is the main element of the structure, since the shadow cast by it is a kind of clock hand indicating the exact time.
The final stage will be the design of the watch. First, think about how you will arrange the hour markers so that the crops planted next to each number are provided with everything necessary for normal development and growth. To do this, for example, you can indicate even numbers on the outer circle of the frame, and odd numbers on the inner circle. The diameter of these circles should be approximately 4 meters and 1.5 meters, respectively. It is also important that the plants used for the composition do not grow higher than 50 centimeters, otherwise the shadow of the gnomon will cover them.

Now - straight to work!
Instructions for making a sundial
The simplest clock design is horizontal, so you can even make it together with your child.

In fact, they can even be created on earth. To do this, draw an even circle and stick a stick into the center - it will serve as a gnomon for you. Draw a straight line north from the center of the circle - this will be noon according to astronomical time. After this, divide the circle into twenty-four equal sectors. Tilt the stick in the north direction at an angle corresponding to the latitude of your particular area. As a result, each sector will correspond to 15 degrees.

Note! Such a sundial will not show the same time as an ordinary clock. After all, solar time, as you know, is not the same as the time of earthly time zones.
Now let's look at how to make a sundial with your own hands, but of a portable type. To do this, you will need a small cardboard box (necessarily flat), which you can cover with paper to match the color of the wood for effect.
If we are talking about a suburban area, then you can use an even round cut of wood or a flat boulder and install it at the intersection of garden paths. On the surface, draw a rectangular dial (if the surface is round, then draw a circle). Draw a line in the center and cut it to secure the gnomon. The main part of the structure is ready!
Now make the gnomon itself, for which you will need to determine the latitude of the area where you live. To make it, you can use either plastic or thick cardboard. To set your watch correctly, take a compass. Point the sharp part of the gnomon to the south, while the north direction will correspond to noon. Insert the gnomon into the slot, seal the joints with glue.

To create divisions, mark the location of the falling shadow every hour. If you divide the surface into twenty-four parts, the clock will show solar time. That's all, good luck with your work!

It might be useful to read:
- Beaver catching at different times of the year;
- Emergency assistance for drowning;
- How to behave in a thunderstorm. Safety regulations;
- How to make a fish dryer with your own hands;
- Medical glue "bf";
- The first sensible review of dry rations from a woman;
- The best steel for a hunting knife;
- Do-it-yourself sundial: decorate the dacha and kindergarten playground;